Let There Be Light! A Living Room Renovation Project with a New Ceiling, Pot Lights, and Hanging Lights – Part 1
Before: South View. We’ve already removed the sliding doors on the closet.
If you have a “dead” space in your house that’s more often used for dumping things than for activities, that’s a sure sign that you need to do some design work to make the space more useful. My partner Justin and I have been working on our living room ceiling for over a year, and now that we can see the finish line, it’s time to start telling the story of our biggest renovation adventure.
The problem was that the entire living room was just a place for watching occasional DVDs – nothing else happened there in spite of the variety of activities Justin and I enjoy. We spend all of our indoor time at the kitchen table talking, reading books , surfing the internet, or working, with laptops strewn everywhere. It was a shame that a space twice the size a few steps away was unused, in spite of some very comfortable furniture. As the biggest room in 903 square feet of living space, not using this space was just silly.
While considering the problem, I realized the issue was the lack of light. Our condo townhouse has natural light coming from only one direction, because the unit is surrounded on three sides by neighbours. While this is a great insulation strategy that saves a bundle on heating costs, it creates a cave-like effect that can limit enjoyment of the space, and frankly, can be disheartening. There was no electric lighting in the living room at all, even though there was an abundance of wall outlets.
The Solution

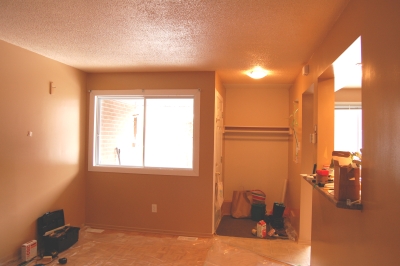
Before: North View
With better illumination, reading books and curling up with a laptop would be feasible. I also wanted to be able to make use of the room as an exercise space to enjoy my yoga practise – large but easily movable furniture would guarantee that.
Supplementing with electric lights should help to balance things out. But what approach to take? In the small 10.5 X 16 foot room, I didn’t want to have the available floor space cluttered with lamp stands. As mentioned, the house overall is very small, so in general the strategy employed was based on Mies Van der Rohe’s famous “less is more” declaration. For a visually uncluttered, open area that’s easy to clean, the solution had to be ceiling lights, and lots of them.
When I originally planned the layout, I hadn’t heard of Lucy Martin’s The Home Lighting Effects Bible. I wish I had, but I still think the lighting scheme I’ve planned will work once it’s done. I wanted to keep the lighting to the outer edges of the room, for the most part reflected from walls. The adjustable pot lights would be pivoting, so I could adjust each one as required, and possibly use a couple to provide enough light for reading or computer work. A trio of hanging lights in the corner would provide light to balance the television, when it was turned on. All the lights would be on dimmer switches, to save energy and to allow us to adjust for the exact amount of light needed. Once we tried it out, we would still be able to add one standing light if any task lighting would be needed.
Planning and Testing

The plan for the new layout, showing where the new lights will go (white circles).
If I knew then what I know now, I would have spent a lot more time researching and planning. As it stands, I knew that as weekend renovators we would have as much time as we needed to stop and think through any details. I will say that I did do a lot of informal thinking and planning, and tested out a lot of critical things, even if I didn’t have a detailed project plan ahead of time. Before investing a lot of time and money, I wanted to make sure I knew what I wanted. Without any real design experience, and without having spent a lot of time in design research, I was a little intimidated. But I was determined to go ahead with the project.
I decided to prioritize what the main functions of this living room would be, in order of probable frequency:
- Traffic pathway to the upper level: the access to the stairs could not be interfered with in any way
- Internet surfing/ DVD viewing: Justin agreed that a new, flat-panel television (preferably wall-mounted) would save previous floor space compared to the cathode-ray behemoth currently dominating the room.
- Conversation area: In spite of very comfortable furniture, when friends and family visit, everyone ends up in the kitchen, even if a meal isn’t a part of the plans. While this isn’t a bad thing, another option would be nice.
- Reading area: currently happening in the bedroom or at the kitchen table.
- Exercise space: again, happening in a tiny area of the bedroom. Bumping into walls really doesn’t help me achieve yoga postures!
After shifting furniture around in different configurations over time, an overall layout was confirmed. The television would still go on the wall furthest from the window. Beside it, the trio of hanging lights at different levels would provide visual interest in the corner. Pot lights would wash over the walls, illuminating art.
The hanging lights were purchased, and temporarily hung from the ceiling using eye bolts. Different distances between each light, and heights for each light were tried, until an overall configuration was finalized. The distance from the wall to each light’s base was recorded, and the lights taken down and stored in a safe area. Once the holes in the ceiling we cut, we were ready to plan the wiring runs. The original strategy my father and I had talked about was to run the wires down behind the walls, into the basement, and then to the circuit panel.
Scope Creep #1: The Ceiling Comes Down
Truthfully, the lighting project could have been done without taking down the whole ceiling. But when it comes to renovations, I seem to live by the old adage “in for a penny, in for a pound”. While I’m being honest, I should admit I have a hate-on for stippled ceilings. Nothing says cheap and shoddy like a “popcorn” stippled ceiling, because it’s not a texture that people use because it looks good – it’s only used to avoid the work of finishing drywall properly.
Even worse, this particular ceiling had rippling waves, exactly like a photo of the surface of the ocean. Uninspired contractors (or possibly someone on their first day) applied the pebble texturing in careless waves, leaving bare flat patches as well as other areas with a mountainous quality to them. The overall effect was rather moon-like, but not in a way that inspires you to make into a feature, the way you’d create LED stars in a ceiling, for example.
When Justin declared that removing and replacing the ceiling would be doable, and would save us the agony of trying to match the texturing of any pieces of drywall we had to replace, I could have wept for joy. It would also allow up to change our wiring plan to run the wires through the ceiling.
Demolition: Dust, Paint Chips, and More Dust
Taking down the ceiling was one of the hardest and dirtiest days of work I’ve done in a long time. On my birthday, we got up early, put our work clothes on, and after a quick bite got to work. We soon figured out that with only one pair of safety glasses and one prybar, we couldn’t both be punching through the drywall at the same time. It was decided that Justin would have at the ceiling with the drywall saw and the prybar, while I took the handoff of the pieces and moved each one outside.
I should mention that we made good use of plastic dropcloths: we covered the entire floor with several thicknesses of it. We also hung sheets at every point where dust could escape – the room felt like a HazMat containment area. Outside in the garden where I was stacking the pieces of ceiling, we also had another thick piece of plastic. All the pieces of painted drywall would scatter tiny chips of paint everywhere, and having some sort of floor protection is critical. It turned out to be a good thing I was on cleanup duty for the day, because I was able to work on clearing up the mess as Justin worked.
Here’s a confession from someone who’s environmentally conscious enough to have a system of “eco-points” to keep track of my impact and to try and balance things out. At the end of the day, instead of washing and reusing the plastic, we just rolled it up and trashed it. That’s how tired I was.
The whole task took almost seven hours, and we were good for nothing else by the end of it. Luckily I had planned ahead the day before and prepared a nice lasagne – all we had to do was pop it in the oven while we washed.
Drywall Disposal
This is another part of the project that I will fully admit is not environmentally friendly. I have since learned that the gypsum in drywall is recyclable in some areas; at that time I didn’t even know to look. The whole ceiling ended up in the landfill.
Unless you’re prepared to portion out tiny bundles for each week’s garbage, a ceiling’s worth of drywall has to be driven to the landfill site. In Ottawa, it’s out on Trail Road. You don’t need to book an appointment, but you need to get it there somehow. You can either rent a truck or enlist help. Justin calculated that with almost 400 pounds of drywall, our light-duty economy cars were not up to the task. Luckily my father has a well-designed Volvo wagon with enough oomph and space, so we bribed him with home-made curry to cart the load for us. After an hour’s worth of loading, I jumped in the passenger seat and went along to help.
The way the landfill cost works is by weight: you drive your car onto the scale before you remove the load, and again after you’re done tossing everything out. The difference determines the cost: I paid about $25.00.
With the demolition work done and the dust settled, we were ready to look at the structure of the studs and the joists and start the wiring. We found, however, a major structural flaw that would put our plans on hold until we solved it.
Next Post: what we found inside the ceiling!
by Jennifer Priest
Follow me on Google +
No comments yet.
Add your comment