Let There Be Light! Part 2: How to Repair a Split Floor Joist
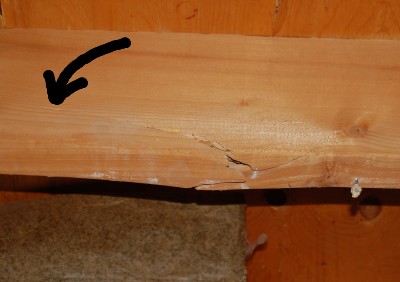
Close up of the split joist, with the arrow indicating the start of the split. The crack is through approximately 1/3 of the beam.
Many homeowners are terrified of opening walls and ceilings, and I can definitely sympathize. The old cliché “you always find problems when you open things up” turned out to be very true in our case. In the end, however, I am glad we took the drywall off the ceiling, because the problem we found could have worsened over the years.
“Well, at least we know what was causing that bump in the ceiling,” Justin noted after the dust has settled from our demolition project. When viewed from the side, a giant foot-long crack that cut through about 1/3 of the joist was clearly visible. This caused part of the joist to sag, pushing down the split edge of the crack. This in turn had pushed the drywall down, causing one of the major ripples in the surface of the drywall. On inspection of the rest of the ceiling, we were relieved that no other problems could be detected – no leaks in any of the water pipes running through the ceiling or wiring problems.
 I was very worried about the problem and fretted about how we would have to figure out a way to fix it. “Definitely,” agreed Justin, “but that will not be hard. It probably won’t cause structural failure of the floor upstairs, but we should fix it on principle. Besides, it will be harder to level the ceiling if we leave it.” I think I should explain at this point that my partner Justin is an engineering physicist who grew up helping his Mom and her best friend do major renovation projects. A born problem solver who epitomizes grace under pressure, there’s no way I could have done this project without him.
Justin’s solution turned out to be reasonably simple: he built a t-shaped apparatus out of 2x4s, and used a hydraulic car jack to push the sagging joist up to the right level. New sister joists were bolted on either side of the faulty one to secure it in the correct position. We ended up raising the joist almost an inch to get it level with its companions on either side, and the edge of the cracked wood still hung down below the level of the joists (we trimmed this off once we were finished).

Sister joists attached to the split joist with carriage bolts.
Here are some important tips if you’re considering trying something like this:
- When nailing your 2x4s together for the top part of the “t”, make sure that the beams are sitting vertically on top of the post. If they are lying on their flat edge, they can’t counteract the force created during the lifting as well, and may bend.
- Ensure that the post of your t-bar sits directly under the sagging joist, so that it gets the pressure from the lift.
- You need a hydraulic jack to do the lifting. Although we used a hydraulic car jack, a bottle jack would have been better (please see the first comment below this post). Don’t use a “jack all” type of jack that ratchets up notch by notch, as it has to lift higher than necessary before it can settle into place. This kind of extra lifting pressure can weaken a floor, especially if the wood is old.
- It is ESSENTIAL to make sure that the jack can’t roll away on you while you’re lifting. If the t-bar slips on you and comes crashing down, it could cause serious injury.
- Don’t nail the sister joist supports to the faulty joist: drill holes and use carriage bolts. Nails can very easily cause wood to split, especially old wood. We also used a generous dose of construction adhesive to help secure the beams (which meant we had to work quickly).

A close up of the split joist with supporting sister joists. Even though the joist is now level, you can see where the split caused a piece of the wood to permanently project – we trimmed this off.
As the outside walls of our house are made of cinderblock, we could not place the sister joists on top of the supporting walls. Our sister joists were just bolted on each side the sagging joist, keeping it straight. Justin decided that every 18” would be good for the bolts, and drilled holes in the sagging joist in-situ, and in the sister joists on the ground. We then lifted each sister joist over the top of the t-bar assembly and into position.
The hardest part of the operation turned out to be getting the bolts through the joists. Even though precise measurements were taken and used when drilling, the bolts needed a bit of hammering to get them through, because the main joist was a bit warped and it was hard to control the drilling angle in a tight space. In the end, we got them through and our joist has stayed put ever since!
Next post: our wiring adventures!
By Jennifer Priest
Follow me on Google +
The W pattern is probably better, but we didn't think of it at the time.That being said, we feel that…