Tidy Your Kitchen Counter with Better Cleaning Tool Storage

Before installation, with gloves and scrubbies everywhere…
Like many people I have a kitchen that is much smaller than I would like, and there is very little available counter space. I have always tried to increase the feeling of space by not storing too many things on the counter, with some success. But one major contributor to countertop mess that I have not been able to vanquish was the need to store dishwashing tools and sponges on the counters.
These are tools that need to be kept in an accessible position: rubber gloves (if you use them), regular scrubbers and pot scrubbers. The sad part is that unless they’re brand new they’re unsightly, and when you’re not using them they take up space, or even get in the way of cooking and cleanup activities. My partner, Justin, who prefers to wash with his manly bare hands, found that my rubber gloves were frequently in the way. After having shopped around for visually appealing scrubbers and holders for over 10 years, I must concede that I’ve been unable to find anything that I feel looks good when left in sight.
The solution? Keep everything hidden from sight but still close at hand. Lee Valley Tools offers a kit to convert decorative panelling in front of sinks into small tip-out trays. The kit (made by Kentucky company Rev-a-Shelf) comes with a set of hinges, two plastic trays, mounting brackets, and screws. Additional handles are not included, and of course we replaced the Phillips screws in the kit with Robertsons. (For some reason our neighbours in the U.S. have not yet embraced the wisdom of Robertson screws. Not only are Robertson screws less likely to have their heads turn to mush, but they are less likely to slip out when you are using them in a tight area.) If you have a dividing bar between the panels in front of the sink, you will need to purchase an extra set of hinges, as we did.
Installation
Hinges and Tray Assembly
 This took an afternoon, and required a bit of patience. Installation involves removing the front panelling, installing the hinges and plastic trays, and then installing the handles to the front of the panel. The instructions in the kit are reasonably thorough, the diagrams clear and understandable. There are two options for hinge installation spelled out.
The operation of installing the hinges can be awkward due to the tight space between the panel and sink. Stubby screwdrivers are an asset for this job. If you have a garbage bin secured to the inside of one of the doors, it will make the installation process difficult. The hinges are single piece assemblies which attach to both the front panel and cabinet wall. Unlike two-piece hinges, this means that one of the fastening steps must be done from behind the installed panel.
Mounting the tray to the inside of the panels was simple enough. Two screws secure each tray through slotted holes. This provides for a nice feature: the trays themselves are removable, which makes them easier to clean.
Positioning Handles with Two Posts on a Drawer Panel
This is a dark art that bears expounding upon, because if you get it wrong there are no do-overs:
- B
 efore deciding where to position the handles, the first step is to look at the surrounding drawers and cupboards themselves. Are they level with each other? Ours were not (just for the record, they came with the house!), so we decided to position the handles slightly higher or lower on each drawer, so that the handles were all level each other, creating a nice flat line. We rested a long level on top of the neighbouring handles, and then figured out our height adjustment factor for each post.
 - On the handle itself, measure the distance between the centre of each post. Record this number.
- Measure the width of the panel. Subtract the distance between the posts, and divide by two. This is how far to measure in from either edge of the panel to get the horizontal coordinate for your drilling point.
- Measure the height of your panel. Divide by two, and that is the vertical drill position (if you need to, factor in your height adjustment from step 1).
-

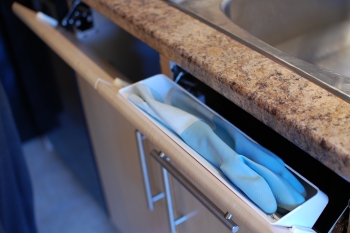
One of the tip-out trays installed, and shown in action.
When drilling, drill with a tiny bit first. It will be easier to keep the drill bit level (so your handles don’t end up at an angle) and you run less risk of creating visible cracks or lifts in the panel surface (especially if it is laminate, like ours). Most importantly, a smaller bit has much less tendency to skitter or skate on the work surface, and the small hole can serve as a guide to keep your large bit on course. Starting your hole with a punch is also a good idea to ensure that your bit does not drift. Once you have a nice straight hole, repeat the process with the bit size that is correct for the handle attachment screws.
Hints and Notes
- Before going ahead with this project, ensure there is enough room between the sink and the cabinet panel for the tray – you should have at least 2 ½ inches of clearance.
- The kit cost is about $25.00, and the extra set of hinges (also from Lee Valley) about $11.00 (plus tax).
- I was initially worried that handles mounted right under the sink would make it harder to get into the sink (I am on the short side). This proved to be unfounded – there was no difference in sink accessibility in the end.
Overall, I would say this project was a complete success: precious counter space has been reclaimed, and the whole effect is visually more pleasing. It has not bothered me at all to have an extra step (retrieving the gloves and scrubbers) added to the dishwashing workflow.

…and after installation of tip-out trays, with cleaning tools stored out of sight. Much better, no?
by Jennifer Priest
Follow me on Google +
No comments yet.
Add your comment