Let There Be Light! Part 4: Wayward Ceiling Joists and the Art of Flat

A laser level was used to establish a level plane for our new ceiling.
One of the problems we were trying to solve as part of this project was a ridiculously wavy ceiling. We had removed all of the ceiling drywall, installed the wiring for the lights, but now we had some levelling to do. Justin knew that the cause of the ripples was that the floor joists were not level with each other. Some were slightly higher, some lower, so that when the drywall was fastened to them the ripples were produced. There were other complications we had to work through before we could start putting up drywall.
“This room was built by drunken sailors! I hate working with pre-existing construction!” This was Justin’s reaction to learning that the room was neither level nor square. Seen from above, the room was not a perfect rectangle, it was more of a parallelogram. The floor was on a slight lilt compared to the horizon, as was the ceiling. We were formulating how to create a flat, level ceiling, and the oddness of the room was going to complicate things.
For newbies, “level” refers to the tilt of a floor, ceiling, etc. when compared to “absolute level” as determined by gravity’s pull on the Earth. A tool called a spirit level contains one or more glass cylinders containing a bottle of fluid, and a horizontal mark. When the air bubble in the cylinder matches the horizontal line, you have achieved a level position. “Square” refers to whether the inside corners of two planes are 90 degrees or not. A “square” floor or ceiling has 90 degree corners – but most rooms are off by some degree. Both are important if you want to build a ceiling that is flat, smooth, and not slanted.
Flattening the Ceiling
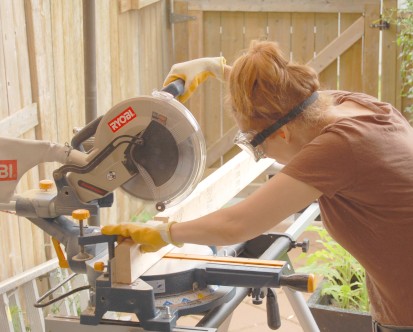
A sliding compound mitre saw was used to cut the 2 x 4s to length, and to cut dado notches for our wiring runs.
The solution that Justin came up with was going to work, but would be time consuming to do. To make everything flat, we were going to have to attach 2 x 4s to the joists, creating a whole new frame for the drywall. Every 2 x 4 was going to need to be cut to a unique length. In some cases, the 2 x 4s would need a dado notch cut into it to make room for cross braces between the joists, holes for our wiring runs, plumbing, or other features in the ceiling.
When seen from the side, the joists had an additional problem: some were higher than their neighbours, some were lower. How were we going to know how high or low to position each piece of 2 x 4? A guiding framework of strings would be used; we would just have to line up the bottom of each new board with the string.
Levelling the Ceiling – and a Painful Decision

Checking the string guides for our levelling frame.
I will confess that we learned we’d made a mistake when we had about half of the drywall up on the ceiling. We were taking a break, admiring our handiwork, when it dawned on us: our ceiling looked like it was going to be beautifully flat, but the whole thing was on a slight tilt, matching the tilt of the joists. When we measured, the whole thing had a 1 ¼” difference over an 8-foot distance.
We were absolutely crushed when we realized that mistake. Over the next week or two, we discussed whether or not it was worth it to take down the drywall and reposition each board in our framework. In the end we decided to delay project completion and redo the work so it was right. After all, we were doing the renovations work ourselves not just to save money, but to get the kind of workmanship that meets our standards. One thing I am proud of us for: we didn’t waste any time “blamestorming” and pointing fingers. Both of us are the kind of people who take responsibility for our own mistakes, which is the only way to become more skillful.

How we created our level ceiling.
Once we got past the painful decision, we realized that it wouldn’t be so bad. The drywall came down in about an hour, and the 2 x 4 frame wouldn’t have to be re-cut from scratch, just repositioned. One thing was for sure: we wanted to make sure that the next time everything was going to be perfectly level!
To do this, we purchased a laser level with a 360-degree rotating assembly. This tool created a line that went all the way around the room, defining a flat level plane. Using a steel ruler, we checked all the joists to find the lowest one. That would become our benchmark, and we would make the rest of them line up with it. We repositioned the 2 x 4 boards along the joist on either end of the room to match this low point. We then attached string guides to these endmost 2 x 4s so that we would be able to tell where each 2 x 4 would need to be lowered to. Each board was raised over top of the string and then positioned so that the string just kissed the lower edge of the board – we could check it by gently lifting the string with a finger. 5” C-clamps were used to hold the board in place and 3” construction screws held each board to the joist.

Checking for gaps in the new level frame of the ceiling with a 4-foot straight edge.
We spent a number of weekends repositioning the boards, as each one had to be carefully aligned. In some cases, the 2 x 4s were slightly bowed on the lower edge (even though we bought the straightest ones we could find). For these ones, we would use a combination of clamps, hammers and elbow grease to force the end of the 2 x 4 into position.
As each 2 x 4 was positioned, we also used a 4-foot steel straight edge to check each new board against its neighbours, looking for gaps or high points. If we found anything, we would recheck our work and adjust the boards as needed.
The Ceiling Goes Back Up
Working with drywall is messy work – but thankfully not as messy as demolition.

Measuring for placement of the holes for the octagon boxes in our drywall.
We had already determined what our drywall “map” was going to be. Drywall is sold with tapered sides, so that the seams with tape and mud will sit nicely level with the rest of the drywall panel. The long ends (the “butt joints”) do not have this feature, so that when you go to cover the gaps, the tape and mud creates a raised bump in your ceiling. Minimizing this ridge involves many thin coats of plaster, travelling from your raised point outwards (“feathering”) until the ridge is made invisible. The art of planning a drywall project involves keeping the number of these butt joints to a minimum, as well as planning for the least amount of scrap left over afterwards. We could have reduced the number of butt joints by buying longer sheets of drywall, but anything longer than 8 feet would be too awkward for us to manage.
Because our room did not have 90-degree corners, several of our drywall panels needed to have trimmed edges. To ensure the best possible fit, we determined the angle, and then cut off an edge on that angle to match. On one drywall panel, we also had to cut fitted holes for the 3 octagon boxes for the hanging lights, and on another we had to cut a hole for our smoke detector box. To do this, Justin measured in from the edges of the panel the correct distance for each side of the box. From there, we cut the holes as closely as possible, as we didn’t want gaps showing after the fixtures were installed.

Panel lifters hold drywall in place for you while you attach them to the ceiling.
It is possible for experienced drywall installers to raise panels and screw them in without a panel lifter. Justin and I, however, rented a panel lifter. We were glad we did, as I am neither brawny nor experienced. It’s great to have the ability to raise the panel using a crank, and then simply wheel the panel into position. At any time you like, you can walk away and take a break, so I highly recommend using one.
Screwing the panels to our frame was simple enough. To ensure we were attaching the panel to the middle of our 2 x 4, we used our 4-foot straight edge to draw a line on the panel matching the frame boards. We then positioned the screws along these lines.
Once all the panels were done, we double-checked everything with our laser level again. We almost wept for joy: the drywall was all perfectly level and beautifully flat. We shared a bottle of red wine to celebrate! We still had a couple of months of plastering in front of us, but seeing those drywall panels in place was almost like having a real ceiling again.
Next post: the thousand and one nuances of choosing paint colours!
By Jennifer Priest
Follow me on Google +
No comments yet.
Add your comment