Die Popcorn Die: A Flat Ceiling is a Beautiful Ceiling
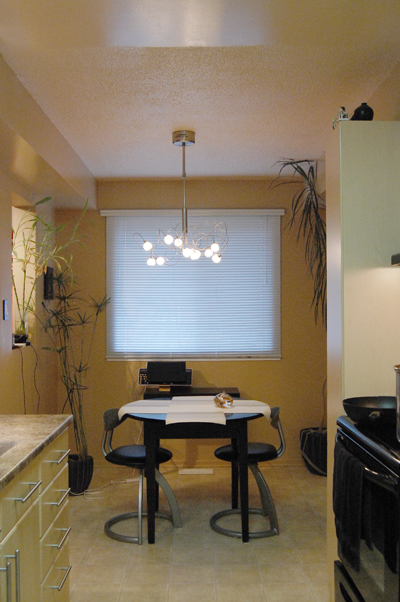
Before: south view. You can see the builders finished half the ceiling, and then just didn’t bother with the rest. Why why why?! You can also see the light fixture was not installed in the centre of the ceiling. I have no one to blame but myself for the glossy paint.
One of the simplest, most cost effective, and excruciating renovations you can undertake is to get rid of a popcorn finish on your ceiling and replace it with a properly mudded finish. I’ve seen this on several lists of renovations that will yield maximum ROI when you go to sell your house as well. Some people may be able to put up with a popcorn ceiling, but no one wants one anymore. It’s easy to see why: nothing argues lack of love in a house than a finish that was applied solely to save builders the expense and fuss of a smooth surface.
Room by room, we’ve been on a mission to get rid of popcorn finishes in our house. We started with our living room (and what an adventure that turned out to be!) and decided that the kitchen was next. Why? We figured it would be reasonably quick, as the area with the popcorn was about 60 square feet – no sweat, right? Best of all, in our small house, that would mean that the entire downstairs would be finished, hooray! Aside from the morale booster I wanted to have the main public space finished and coordinated with the living room as the entire downstairs is connected visually. There were also some other smaller things I wanted to take care of while we were at it. The kitchen was in serious need of a new coat of paint and a new lighting fixture, as the giant fluorescent one was so awful we just never used it. The lighting fixture in the dining area needed to be centred. There was also a telephone connection that was an unnecessary visual distraction in a house where everyone uses a mobile or Skype for phone calls.
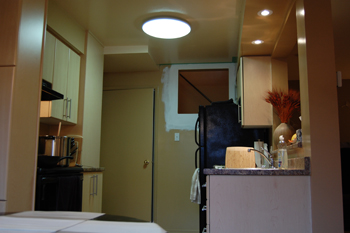
Before – the north view, featuring a fluorescent light fixture that kills the room, a phone jack that doesn’t need to be there, and a light window that needed finishing.
One day, we hope to give the entire kitchen a thorough overhaul. The biggest want on the list is replacing the vinyl flooring with tile, and possibly reorganizing the storage so that the tall pantry cupboard isn’t blocking light into the room. The vinyl isn’t a complete eyesore yet, however, and for me the lowest hanging fruit in the house right now are the popcorn ceilings throughout, followed closely by putting some sort of hardwood on the upstairs floors so that we can get rid of the sloppily-installed wall to wall carpet. When doing renovations, in general it’s a good idea to go top to bottom, to avoid damaging new floors.
How Hard Could it Be?

The hero of the project: the A. Richard scraper.
Our research into removing the popcorn finish from the ceiling looked promising: several articles promised that popcorn can be softened with water from a spray bottle and then easily scraped off. That may be true in some cases, but with our ceiling we were in for a few days of scraping, exhaustion and sore muscles. We tried the water, but even though it penetrated the paint, our popcorn seemed to have been applied with someone on a mission to make it last forever. It had been very, very thoroughly plastered on.
For a while we weren’t even sure how we were going to get it off. My husband tried a drywall mudding knife, and some sturdier tools, but they didn’t seem to get through very well. We were considering renting some sort of industrial sander, we were that desperate. After perusing through our tool collection, I brought out the sturdiest tool with a sharpened edge I could find: my husband’s scraper bar. After a few minutes of hacking, chipping, and shoving, success! A nice mess of popcorn flakes on the floor was my reward – we were never so relieved to have been able to make so much mess! But at least we were in business. Over the next few days, we generated a full garbage bag of ceiling flakes, and had ground down to drywall in most places. A few very stubborn spots refused to go, and rather than replace the drywall entirely, we decided to build up with mud instead.
Controlling Drywall Dust When Mudding
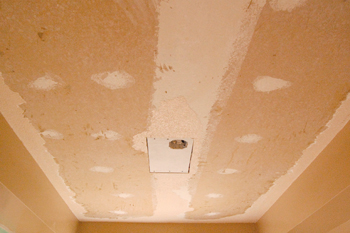
The popcorn has been mostly removed, and the box for the light fixture has been moved 2.5 inches to the right (it’s all in the details, people…).
There are some drywall plastering masters like my Dad who can mud almost without sanding. For the rest of us, sanding drywall between coats is a chalky nightmare. We’d had some experience working overhead on ceiling drywalling projects, and we knew we wanted to do a better job of controlling the dust this time. The solution turned out to be a $25 dollar investment in a sanding screen vacuum attachment for our shop vac that we were glad we’d made. Even when sanding overhead, it worked very well to minimize the dust.
Removing the telephone jack was easy – we simply unscrewed the jack and put a small piece of drywall in the hole that remained. Drywall would erase any evidence that there has ever been a jack there, creating a smoother look in an area where we didn’t need to draw attention. Thank you, wireless future!
The Fun Part
Choosing paint colours was easy this time as I knew I wanted to use the same ones as the living room to visually unite the two spaces. Even in the kitchen, I knew I wanted the same gorgeous flat finish – although we did leave the glossy behind the stove as we end up having to clean that frequently (my husband is an amazing, if messy, cook). We plan to tile that space in the near future – it’s a small area, so I think it will be a great mini project that will help me learn how to tile without getting in over my head with a big space.
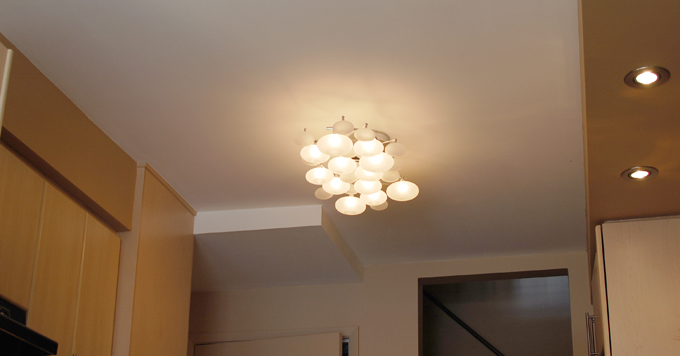
Sweet after photo! Our ceiling after popcorn finish removal, showing our new Lilypad light fixture.
The ceiling would be the same colour as the living room (Behr’s Creamy White), and the walls would use Peanut Butter and Renoir Bisque, both also from Behr. In terms of placement, I decided to reverse the orientation of the colours: in the living room, only the north wall is Peanut Butter, but in the kitchen I used it for the east and west walls. Using the lighter Renoir Bisque for the south wall with the window and the north wall opposite helps give the daylight we get a bit of a boost.
Choosing a new light fixture turned out to be time consuming (much to the amusement of my husband). Several weeks of shopping in stores both online and locally didn’t reveal much we were both convinced would work. Our requirements were:
- A light that would provide some background fill light in the half of the kitchen furthest from the window (we’re going to add some dedicated task lighting under the cupboard in a separate mini-project later on).
- Something that subtly echoes the shape of the room (more long than wide).
- Something that doesn’t dangle too far down in a space that doubles as a traffic path to the basement door.
- Something that provides some light and shadow patterning when switched on, to add a little visual interest.
- Something that doesn’t compete too much with the light in the eating area, but doesn’t fight with it either.
- Something with a rounded, organic shape, to keep with the overall lighting theme.
- Something with a brushed nickel or stainless steel finish, which is what I am using for all visible metals.
Having your requirements beforehand really helps in the shopping process, because there are thousands of wonderful choices out there, and it is so easy to get off key. One of the best pieces of advice about design I have ever received it to have a theme and stick to it to unify your spaces and help with decision making. Even so, it still took me weeks to make my choice. The winner was a light called Lily Pad by Possini Euro that looks great in the space and didn’t break the bank either (at just over $400.00). My husband installed a dimmer switch on it so we can enjoy a variety of lighting effects, and months later we both still love it.
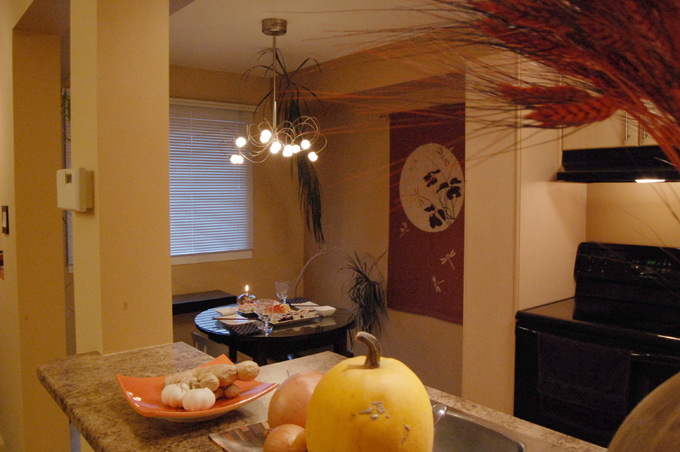
After – the popcorn is gone gone gone, the new coat of flat paint has created a more romantic mood, and our table has a snazzy new glass top.
The final touch was something I had wanted to do for a while: put a glass top on our kitchen table. At 8 feet by 10 feet, our eating area is admittedly tiny, and a small table is a must. I was lucky enough to have the perfect table for the space when I moved in: my grandfather’s poker table, with a chic ebony finish by my Mom. A table this small means entertaining is cozy, however, and one of the most problematic parts about fitting four at the table turned out to be unglamourously overlapping place mats. Now that I have some small but pretty dishes (“East Meets West” by Maxwell Williams), a glass table top would mean there’s no need for place mats at all, and cleanup is a breeze. A local custom glass manufacturer provided the solution, which cost us about $160.00. Something to remember about glass is that it will definitely bounce more light around your room, especially when placed near a window. On sunny afternoons, the whole kitchen glows!
What’s Next?
There’s still a lot to do in the kitchen, but having a ceiling that doesn’t make me depressed when I look at it is a huge boost. Aside from the new floor and tiles behind the stove mentioned above, my kitchen wish list for the future includes:
- A new, powerful, but hopefully more quiet range hood.
- New window treatment.
- Additional lighting – possibly pot lights in the eating area to add drama to the walls.
- A sideboard/console under the window (it’s going to need to be custom, as the ones I’ve seen are all 17” deep, and our space can only accommodate 12” maximum).
Baby Steps
One of the most important lessons I’ve learned on this project is that having a dream kitchen wish list is great but, that when you’re doing the work yourself, breaking things up into mini projects can help save your sanity. Doing a full kitchen renovation from top to bottom would be awesome, but when you’re living in a small space, sometimes the tortoise still wins the race!
So everybody, what do you think?
by Jennifer Priest
Follow me on Google +
Thanks so much! I still think it was worth it. If you try it yourselves, try to do it before…