Renovation Story: Full Kitchen Rebuild
Making the Decision
A kitchen renovation is one of the most difficult projects a DIYer can attempt. With structural, plumbing, wiring and carpentry components, kitchen renos are definitely a complex undertaking. The inconvenience during the project is at a maximum as well: a whole new strategy for food preparation and clean-up has to be devised (dishes in the bathtub, anyone?).
Sometimes, just getting to the point where you can start a project that you really want to do can be a project in itself. That’s what Sue Laframboise*, her best friend Marg Pellew*, and Sue`s son, Justin, learned when Sue decided that her kitchen layout made her daily routine far too time consuming.
Kitchen Issues: The Problems That Needed Solving
- The galley kitchen was not only small, but its two narrow access points on either end made traffic flow awkward. It also made dining room access more difficult than it needed to be.
- There was insufficient storage space for kitchen tools and appliances.
- People kept trying to gather in the kitchen – it’s a natural thing to do, but there was nowhere for them to sit.
- An outdated and insufficient electrical layout meant that busy workday mornings were slowed down waiting for power to be available for the kettle and toaster in turn.
Team roles were easy to sort out. As the homeowner and design enthusiast, Sue would make the aesthetic and layout decisions. With the patience for fine-tuning, she would handle finishing activities like plastering and painting. She would also keep everyone fed by cooking meals at her cottage. Marg and Justin would do research as well as the actual construction. With his electrical experience, Justin would handle any new circuits and wiring tasks. All three had experience from several other renovation projects, including floors, bathrooms, and building two entire garages.
With a list of problems to solve, the trio decided that if they were going to be satisfied with the end results, they had a major logistics issue to solve first.
Combining Spaces
“We knew we couldn`t start the kitchen until we solved our living room problem,” explained Sue. “We had a more formal sitting room that we wanted to combine with the informal television area. But at the time, we couldn’t figure out how to do it. The television and its cabinet were just too big.”
In the original layout, the dining area was combined with a TV room. In order for a more efficient kitchen layout to be successful, the entire space would be needed for a kitchen island and dining area. A preliminary living room project would be necessary to free up space for the new dining area. But how should TV viewing be incorporated into the living room?

Break time! The TV in its new location.
The answer took some thought. Part of the problem was that the formal sitting room also was a traffic way between the front door and the rest of the house. Simply stuffing a bunch of furniture into the living room would mean blocking that essential access route. Rearranging the room would not be easy with only one wall in the room free: a corner-to-corner window on one wall and a fireplace on the other also limited options.
The solution came with a decision to upgrade the television to a more modern flat-panel version that occupied far less space, making the old cathode-ray behemoth and its cabinet unnecessary. Mounted out of the way on a narrow wall on the path between the front door and the kitchen, the television is easily viewable from any of the sofas, safely positioned on the walls away from the fireplace (this project will be covered in a separate posting). It also meant that the room saw a lot more use, instead of serving just as a traffic way.
Getting Started

Tearing down the old kitchen – you can see where tape marks a wall (just removed) and the trial location for the new island.
Solving the television problem opened the floodgates for the rest of the project. The first step was the demolition of the entire kitchen: cabinets were torn out, and the room was stripped down to the studs. In the case of the outer wall, the team took the opportunity to upgrade the exterior insulation. Ceiling tiles were removed to make room for wiring runs: pendant lights would be added over the island. As a new floor would be part of the project, the old one had to come up too.
While the demolition work was taking place, the team decided to finalize some layout decisions. Green painter’s tape marked the location of the island and the limit of the counters. By practising walking around the tape as though the fixtures were already in place, they gave the proposed new traffic flow a thorough testing.

The exterior wall with new insulation.
Layout and Configuration Decisions:
- The need to maintain easy access to a dining room window decided the extent of a run of counters
- The team considered taking out the entire interior kitchen wall, to make the kitchen layout more open-concept. A direct view into the bathroom and the need to maintain at least a bit of separation between them were the deciding factors against this idea.
- The positioning of the stove, sink and fridge were arranged in the classic working triangle, with more or less equal space between each station. In a galley kitchen, this allows the most room between stations.
New kitchen cabinets in a natural oak finish were ordered from Kitchencraft.
Wiring
The wiring project started with a thorough knowledge of the initial electric plan. Problems like kitchen outlets and bedroom outlets on the same circuit needed correction before any new work could start.
The new wiring run along the ceiling to the pendant lights above the island was just the beginning. New circuits were run from an existing upstairs subpanel to new outlets in both kitchen walls. An additional wiring run up from the basement to the future island location was also needed.

Wiring added to the old interior walls.
Two of the four duplex outlets existing in the kitchen were on circuits shared with other parts of the house (which is no longer acceptable by Ontario electrical code), and the other two were proper split duplex outlets. (A duplex outlet has two sockets, each of which is on a separate circuit. This helps to prevent overloading circuits when both sockets have high-draw appliances plugged in.)This meant that there was a risk of tripping the breaker if high-draw items like a toaster and a kettle ended up plugged into the same circuit (which did indeed happen frequently). For maximum flexibility, a separate circuit for each half of the duplex outlets was needed. Additional dedicated circuits were needed for the range hood, microwave, and fridge.
All in all, a total of 13 circuits were planned for the kitchen, not including the circuit supplying the stove. Because the house already had a sub-panel fed by the main circuit panel, the wiring runs were not too long.
Drywalling …and an Unpleasant Surprise

The new interior wall, ready to go up.
The wiring and exterior re-insulation (with new vapour barrier) were taken care of. It was time to install the new drywall. The panels in the exterior wall went just fine- the new surface was smooth and looked nicely flat when completed.
The interior wall was an entirely different story. The studs forming the wall weren’t level at all, and it was looking like trying to attach the drywall was going to be a complete nightmare. Forty five minutes of fighting with the twisted studs convinced Marg that the time they would spend shimming and rechecking would be better spent in building a new wall. As it wasn’t a structural wall, Justin and Sue agreed, down the old wall came! By the next day, a new interior wall frame was up. Pulling the newly run wires and re-wiring the new wall added an extra day.
Making a decision like this can be difficult, but sometimes it’s better to go with a better quality finished product that causes less frustration.
The next steps were to apply the drywall, spackle the seams of the drywall, sand, then prime, and finally paint.
Flooring & Subflooring

The floor, stripped down to the joists.
Now that the walls were ready, it was time to tackle the flooring.
The rest of the house floor was done in a high quality oak parquet that wasn’t available anymore, which meant that there would need to be a different floor in the kitchen than the rest of the house (the project budget would not allow for a completely new floor throughout). Sue considered tiling the kitchen floor, but that would mean a lot of extra work preparing additional subfloor layers. Tile floor is prone to cracking unless laid on a perfect subsurface, which includes a cementboard layer that will resist flexing and remain perfectly level over time. In an older house with a floor that is less rigid, this could be a potentially complex task.

The subfloor and underlay.
For budget and convenience, a laminate composite click floor was chosen. As laminate flooring quality can vary wildly, a small test piece was subjected to a thorough set of scratch tests, including cutting with a box knife. The chosen floor sample stood up well, and so the final purchase was made.
The floors were torn down to the joists, and the joists were then checked with a level. Spots where bits of the old particleboard subfloor glue was still glued to the joists were planed away with a draw knife to create a level surface.

The flooring installed.
Plywood (5/8” thick) was laid on top of the joists to create a new subfloor, and mahogany underlay (1/4” thick) on top of that. Mahogany is typically used as an underlay because of its smooth grain, which doesn’t transmit patterns if linoleum is ever placed on top of it. It is also reasonably resistant to water damage – a great feature in areas like kitchens which are prone to spills. It is also very cost effective.
The plywood and mahogany underlay were placed so that the seams were staggered. This effectively redistributes the weight of anyone walking on the floor, and prevents seams in the upper level from floating apart and the plywood subfloor seams from buckling.
The click floor was laid on top of the mahogany underlay. Like most floating click floors, this one needed a cushioned padding that would not only dampen sound and allow the floor to move, but would provide a more pleasant surface to walk on, or stand on during food preparation.
Cabinet Installation

The first cabinets go in.
Because none of the team had a lot of experience with finish carpentry, a local contractor was hired to install the cabinets when they arrived. It was also very important that all of the finicky details were perfectly executed. This illustrates an excellent point: DIY doesn’t mean you have to do everything yourself. If something is beyond your current skill level, or you want to expedite a certain stage of the project, you can hire a contractor to help you out. This carpenter came very highly recommended from several trustworthy sources, and he did a great job quickly and efficiently. He was comfortable with Marg and Justin hanging around while he worked, so they learned several great tips from him. Marg ended up learning about a new tool from him: a type of oscillating tool called a Fein multimaster (they are more common these days, but were just starting to come onto the common market in 2010).
Island Construction and Counter Tops

The breakfast bar island, under construction.
After the traffic flow and space utilization tests had been completed, and the green tape marking the island location moved to its final position, the island itself needed to be constructed.
The island was basically a wall with a set of cabinets built beside them. Both were covered in the same countertop material that went into the rest of the kitchen. The Cabinets were a double set of wide drawers, and were used to store utensils, linens and other flat items.
Because the cabinets would be independently resting on the ground, the island wall was basically a normal wall. A 2 x 4” frame was bolted to the subfloor, and finished with an oak beadboard to match the cabinets. Oak corbels (shelf supports) were placed, and the countertop on the upper breakfast bar installed with construction adhesive (weighted down to ensure good connections to the contact points – there were only three spots where screws could be used). As the final click floor was already installed, the only thing left to do was finish with baseboards – this was handled as part of the final finishing and trimming stage (installing sinks and taps will be covered as part of another post).
The Best Part of a Project is Being Done!
After over a year of planning and two months of labour, the project was done. The team all agreed that taking the time to research, test and plan was worth it-after two years, the new layout is still a success. Workday mornings go a lot faster now that more than one appliance can be in use at the same time. With more storage space and counter area, working in the kitchen is a lot easier. Cooking is a lot more social and fun now that guests can sit at the island and talk to the cook without getting in the way.
Helpful general hints for kitchen renovations:
- Know what problems you want to solve before you start, and what advantages you want to maintain.
- Sue was glad she purchased a fridge with French doors, rather than one with a single wider door. In galley kitchens, narrower French doors allow more room to move around
- If you build an island, adding an electrical outlet is the best way to go: they really come in handy during larger cooking projects!
- Wear gloves when installing sinks – unfinished edges can be razor sharp.
- Because appliances like toasters and kettles emit heat and steam that can damage cabinets, the gap between the countertop and the bottom of the upper wall-mounted cabinets should be 18 inches, minimum (this is an industry standard that is sometimes missed by DIYers).

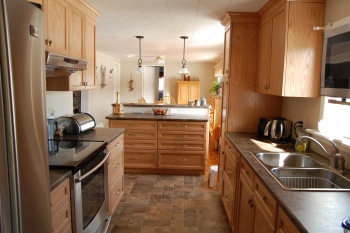
Done! The view into the kitchen.
Done! The view towards the island.
_______________________________
* Names have been changed for privacy reasons.
by Jennifer Priest
Follow me on Google +
No comments yet.
Add your comment