We Build a Custom Boutique Closet
So it turns out there’s a reason people have to pay a lot to get a highly customized closet. It’s because closet and cabinetry work is fiendishly tricky. And that’s without magic LED lighting that turns on when you open the door. Hundreds of hours of planning, building, and messy, messy sanding went into this DIY closet. We needed to learn some basic woodworking skills so we could build the drawers, and that alone took months to get results we were happy with.
But it’s all worth it, even if you’re not a fashionista.
Why? Closets shouldn’t be black holes into which your things disappear, never to return. You shouldn’t have to move things to find other things. It should be easy to see what you have all at once without having to slide doors around. That way, you avoid “nothing to wear” syndrome because you can combine what you have in new ways — and hopefully save some money on new clothes while you’re at it.
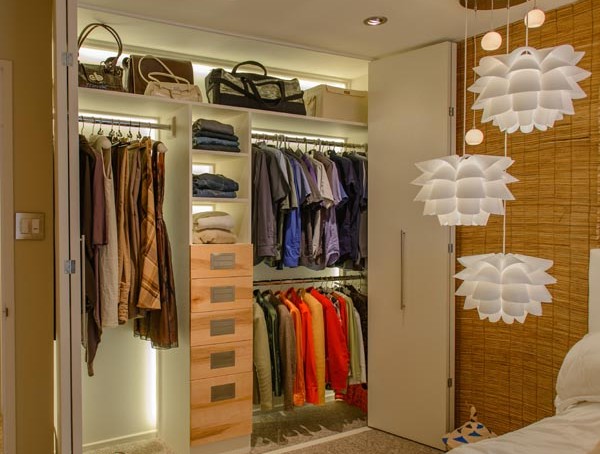
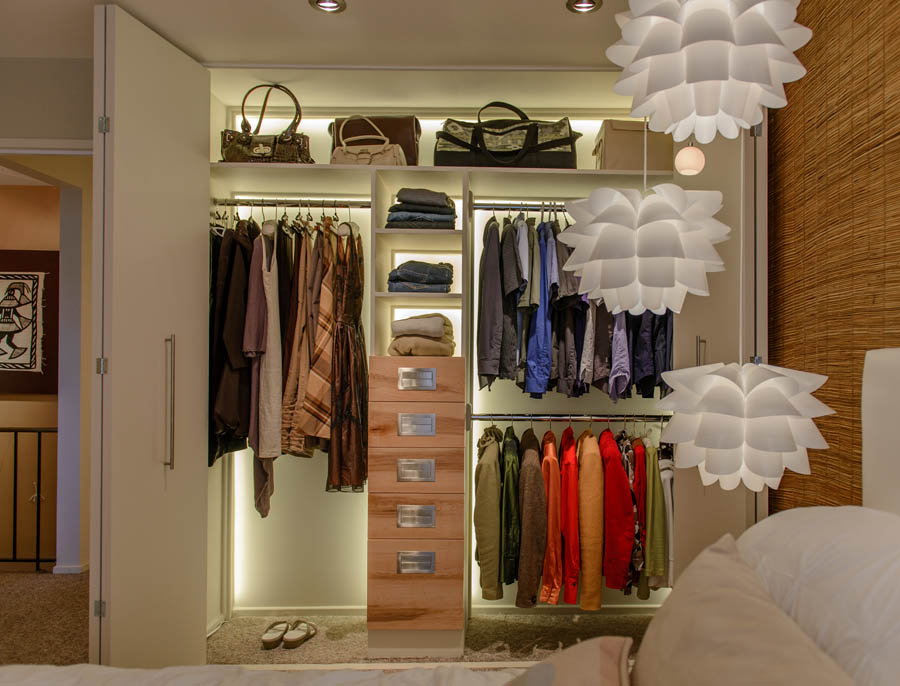
After. Not too shabby for something that’s not a walk-in, n’est-ce pas?
Let’s backtrack a bit. More than a year ago, we started out on our bedroom renovation, and tore out the entire closet while we were at it. Before the dust started flying, here’s what we had.
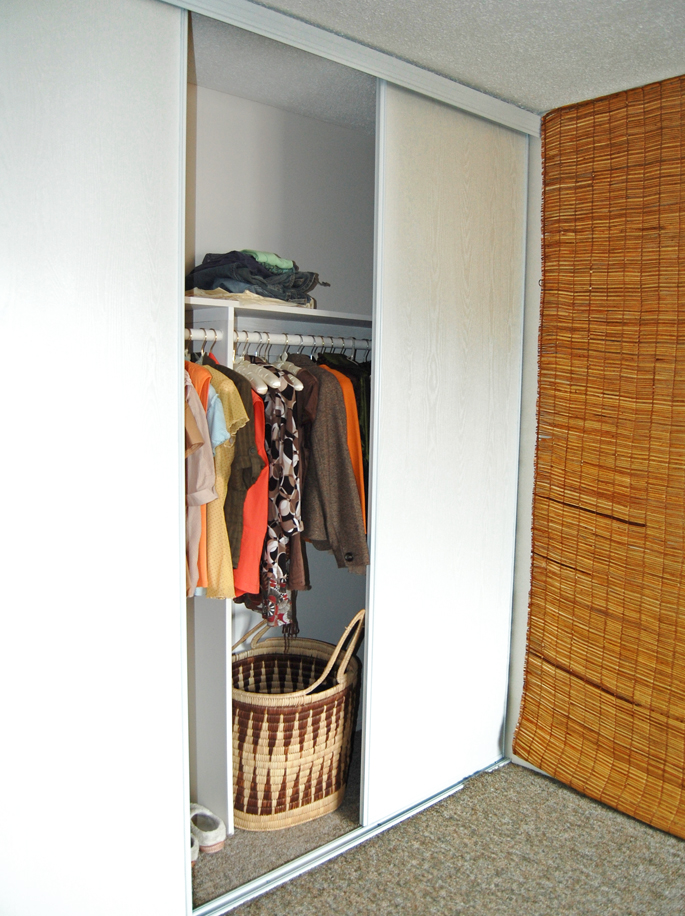
Before: the closet I got when we bought the home.
You’ve seen it before: the builder’s special. One shelf, one bar, and warped sliding doors that scraped every time you slid them. LOTS of wasted space.
I had this crazy dream that my closet would be so well-designed that I wouldn’t have to guess where things were. Strictly grab and go; that’s what I was after. My maintenance work would happen twice a year: I would exchange corduroys and woolies for sheers and flowing fabrics or vice versa. But no more hunting around in poor lighting for things that were buried who-knows-where.
We would also be able to move my husband’s things out of the study closet so that we could keep computer add ons and financial records in there instead. Everything would be (gasp!) off the floor.
I know, I know, call me crazy.
But it looks like we’ve finally done it. We’ve got a closet that is small but makes efficient use of space.
Things I Love Most About the New Closet
Aside from the fact that it’s finally done, here are some great features you might want to use for your own closet:
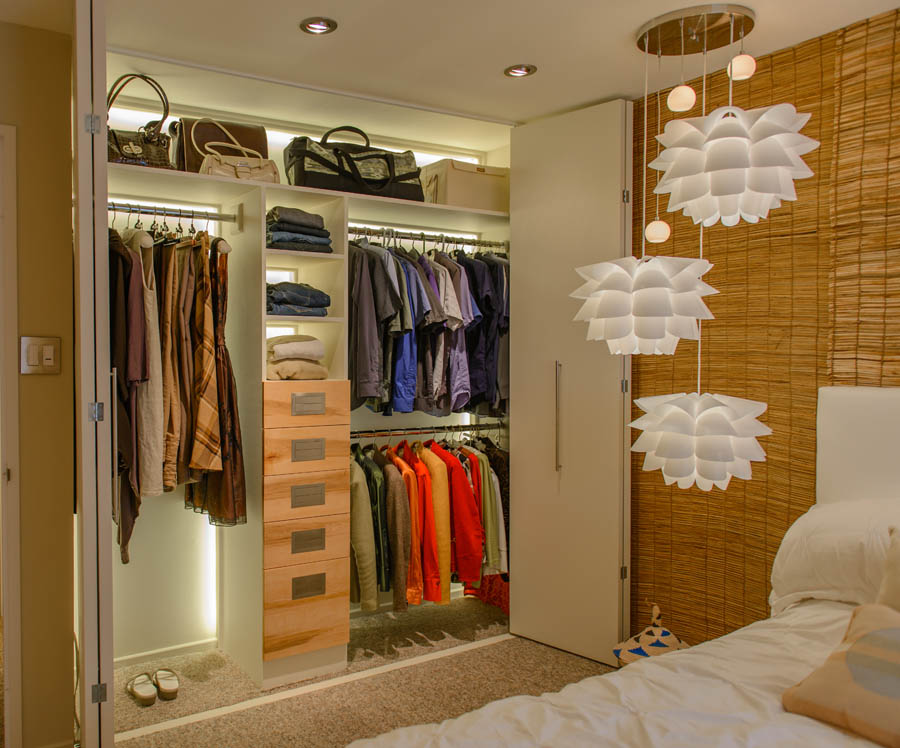
- Lighting in the closet not only looks good, it helps you find things easily. It makes everything look like it’s worthy of display— even it’s an old favourite that’s not exactly on the cutting edge of fashion.
- Bifold doors allow me to see everything at once. They also keep the cats out of the closet (they were able to open the sliding doors and let themselves in, resulting in clothes that were hair-covered up to kitty height).
- There’s a tall space for trousers, skirts and dresses on the left and two shorter spaces for shirts and jackets. I think that’s what makes it surprisingly easy to keep everything tidy: it’s organized by shape.
- The central column of drawers and cubbies makes it easy to store favourites.
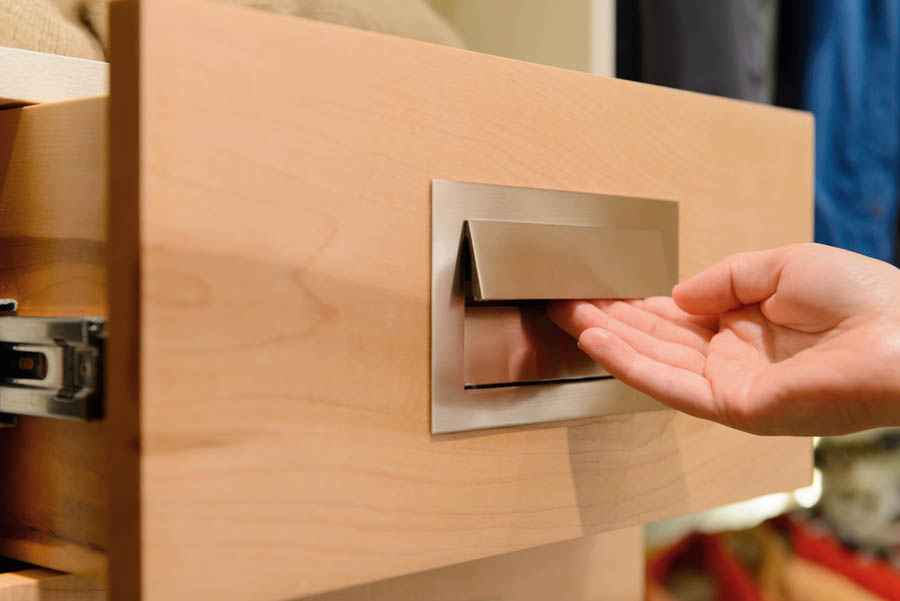
The drawer pulls can be grabbed from above or below, then they spring back into place.
How We Built It
Most of the closet is built with 1/2 inch maple plywood, painted. The drawers are 1/2 inch thick maple from Adams and Kennedy/The Wood Source. I loved the look of the heartwood and felt it would go well with the brushed nickel finish on the drawer pulls.
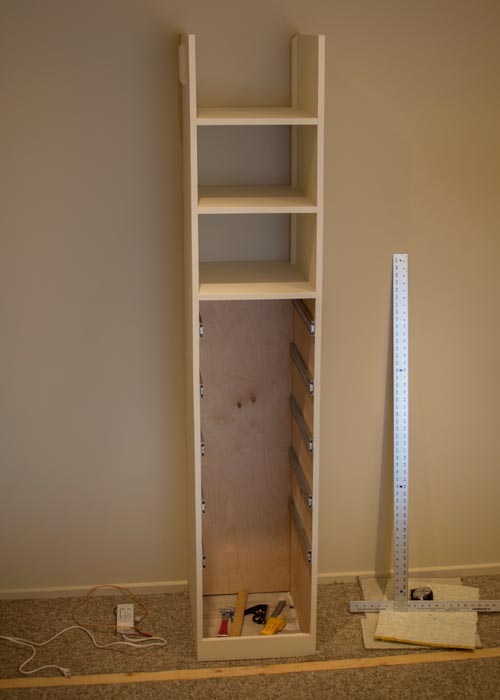
The plywood drawer frams and cubbies is in place – you can see where we’ve cut the carpet to make room.
The Plywood Shelves
In our original plan, I knew I wanted to have a high shelf and a central column with cubbies and drawers. It was mostly my husband who built the central column according to my design, with yours truly on the sanding and painting. The cubbies are actually really deep, but I purposely kept them small to avoid too much stacking and cramming. I know my weaknesses.
The construction of the central column happened in our basement workshop, and we moved the entire thing more or less intact all the way to the second floor. We anchored it to the wall, shimmed it level and added the top shelf.
Once we had the shelving in and the lights connected, I noticed some weird shadows where the frame met the wall. It was just a normal gap, but with the lights on it completely ruined the effect. To fix it, I spent at least 3 weeks of adding spackle and sanding the joint to a smooth curve. It looks perfect now, but those closest to me are now convinced I’m insane. It’s all in the details, people.
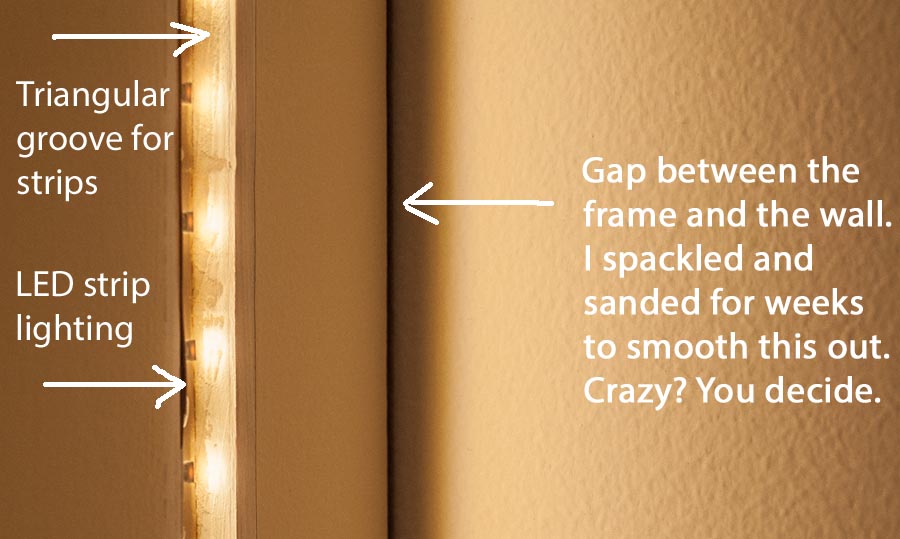
We used a router to create a groove for the LED strips, so they were angled in to the space a bit.
LED Strips for Backlighting
There are two sources of light for the closet: pot lights on the ceiling light the front of the clothes. LED strip lighting provides the boutique-y backlighting.
We added the electrical outlet when we were rewiring the room for the pot lights. From there we used LED strip lighting with a warm cast at a density of one light per ½ inch. You can get strip lighting that will have more lights or fewer, depending on how bright you wanted the overall effect to be. I originally wanted brighter lights, but my husband wisely suggested the middle ground so we don’t get blasted with the light of a thousand suns every time we want to open the door.
With strip lighting it is critical to shield the light source from the eyes. Wherever needed, we added quarter rounds that you would normally use in front of baseboards.
It is also important to consider the power source when planning a strip lighting run. The further the lights are from the power source, the dimmer they will be; you don’t want one side of the closet to be dimmer than the other. This means you can’t endlessly connect light strips together and expect even results. To solve this, we opted for more branches at convenient spots.
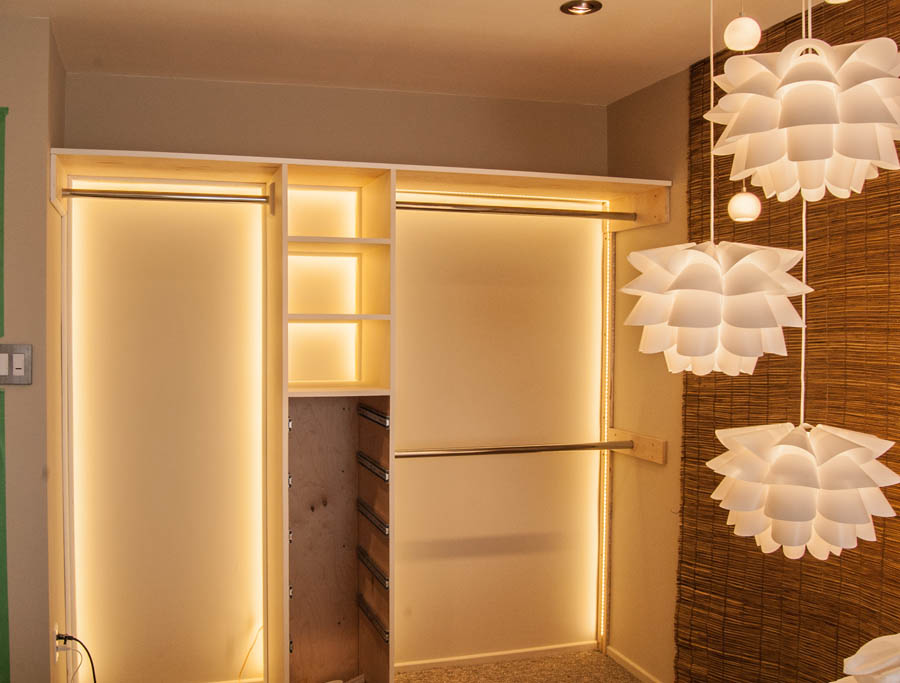
Our plywood frame is in place, the drawer slides installed. On the left you can see the quarter round are hiding the LED strips from the eye, so all you see is the glow off the back wall. On the right, none of the quarter rounds are in place.
The Drawers
Building your own drawers is really difficult – it’s a skill that has to develop over time with practice. It’s a lot more specialized than, say, fitting sheets of drywall to some studs. If you aren’t interested in learning woodworking like I am, I recommend you hire someone to build this part for you. They can help you avoid the kinds of gotchas that we ran into. Without going in to the embarrassing details, I will admit that the drawers pictured here are not our first attempt.
Just so you get an idea of the separate sets of skills we needed, here’s a list of all the things we had to stop, research and learn before we could keep going:
- Glueing up boards to make larger, seamless panels.
- Dovetail joinery. We used a dovetail jig and a router, after a course in hand-made dovetails revealed to me that if we went that route, I wouldn’t get finished drawers until 2063.
- Routering, including making the inset for the drawer pulls.
- Sanding.
- Finishing the wood.
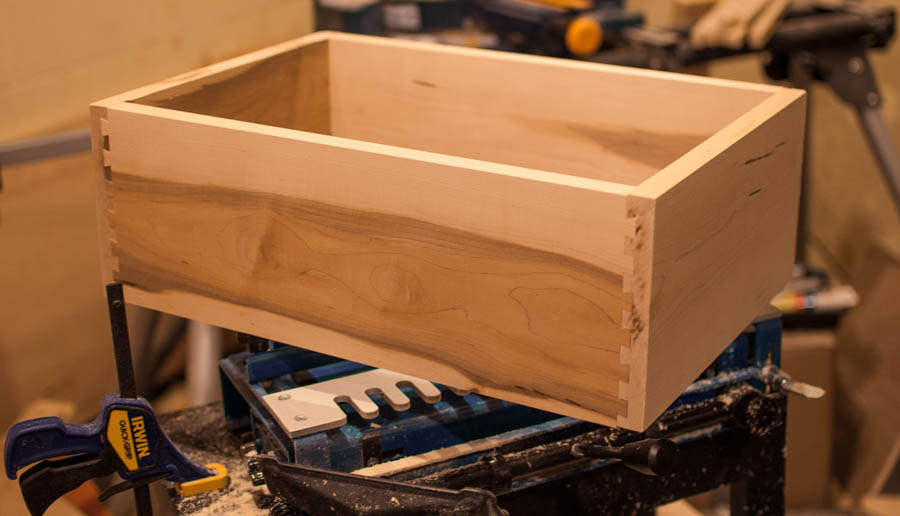
One of the drawers, part way finished. It’s sitting on top of the dovetail jig we used to create the dovetails. With practice, our dovetails got tighter.
Those people in the YouTube videos make all these things look so easy, but there is a lot of manual dexterity to develop. But this was hands down my favourite part of the project – I can’t wait to build my next cabinet, in fact.
Fitting the drawers into the plywood frame was a bit nerve-wracking, but we got them in. We used special heavy-duty smooth-sliding drawer slides. There are some minor imperfections in the alignment of the drawer faces, but you need to be up close to see them.
The Bifold Doors
Because I was desperate to get back into the bedroom and stop keeping my clothes in garbage bags, the closet was left in a semi-complete state for a long time. It was a nice closet, just no doors.
We started researching nice hardwood doors, and after digging into some carpentry forums we learned that it’s very difficult to make large solid wood doors that don’t end up warping. People who’d been making custom cabinets for decades were complaining about customers insisting on this. We felt that making our own doors might be a bit more than we could do.
We also had some trouble finding a local custom door maker that would make them the size we needed. We decided to order just the panels, and put them together ourselves. Finding the right hardware online wasn’t hard.
By that time we were reaching the limits of our budget, so we decided to go with composite panels that wouldn’t warp. They would have a plain masonite surface that I would paint to match the trim in the room. I didn’t mind not having real wood for the doors for two reasons. Firstly, I wanted something very light to match the light curtain panels on the opposite side of the room. As interior design guru Kelly Hoppen once said, “create a symmetry and very gently break it”. Secondly, the closet doors are not where I want the observer’s eye to go. There’s plenty of other eye candy in the room.
Even though we measured very carefully, getting the doors into the space was a major pain. That’s because the angles in the closet space weren’t square, and neither were our custom-built doors! My husband ended up shaving off bits of the tops of some of the doors to make it work. Next time, we’ll be more careful about trying to fit rectangles into parallelograms.
After that it was simple: paint and add handles…and enjoy, at last!
by Jennifer Priest
All photos by Jennifer Priest and Justin Dane
No comments yet.
Add your comment