Soft as a Baby’s Bottom: Drywall Seams Without Sanding

My awesome Dad, mixing drywall compound or “mud” on top of his home-made scaffold.
My parents own an older house, and it seems that some of my earliest memories are of them doing renovation projects (must be where I get it!). One of the things I’ve come to admire is Dad’s meticulousness when it comes to projects. He has an engineer’s precision even when it comes to rough renovation projects like drywall. My Mom told me a story once about how she had been doing some drywall inside a closet, and Dad came along when she was done, ran a straight edge over it, and told her it wasn’t flat enough! After that, it became my Dad’s job to do the drywall work, from patches to new wall seams.
There’s a reason why so many people hate doing drywall: the dust, also known as “divorce dust”. It gets into everything, even when you’ve sealed off a work area, and will easily kill any normal household vacuum cleaner, even good quality ones (always use a shop vacuum first). As I’ve learned, most drywall mudding jobs involve a lot of upper body strength, especially when working overhead. Drywall compound (“mud”) is like the thickest icing you’ve ever tried to spread, and it’s full of air bubbles. It’s working the air bubbles out that takes the bicep work. Then of course, you have the infuriating task of making the mud flat enough when every pass with the putty knife seems to leave more ridges. This is why most people do rough passes with the mud, let it dry, then sand flat – getting dust everywhere. My Dad, however, has developed a technique that (once you get the hang of it) eliminates the sanding.
Fair warning: he’s been perfecting this for over 30 years; if you’re like me you’ll still need to do some light sanding until you get a handle on the technique. One of the beauties of his method, however, is that he adds more water to the mud. This makes it easier for the upper body strength challenged (like yours truly) to work with. Note: we’re working with pre-mixed drywall compound available in pails of various sizes here, not the powder that you mix yourself.
Here’s how he does it.
Preparation and Mixing
These steps apply for plastering the seams of regular drywall joints, or for patching cracks. You’ll need to do a bit more work for butt joints in drywall.
-

A “bubble” in the drywall tape – this disappears after it dries.
Safety first: make sure you have eye protection, especially if you’re working overhead.
- If you’re working overhead or high up on a wall, place a sturdy plank that will support your weight on the lowest rung between two ladders. This will create a scaffold that you can use to quickly walk along the length of your seam. Timing is everything, so don’t count on this technique working if you are constantly climbing up and down ladders and moving them around.
- Mixing the mud: have an empty bucket ready to use as your “working bucket”. Take a blob of mud, and add a bit of water so that it is easy for the bubbles to be worked out. You don’t want the mud to be runny, just a bit more workable than the way it arrives.
- Add a bit of water to the top of your original bucket as well – don’t mix it in, just let it sit on top. This prevents the mud from drying out, if you’re using the same batch again later.
- My Dad uses a palette, rather than a hock, for carrying his working mud. If you want to save a few dollars or don’t have a lot of storage space, you may want to do the same.

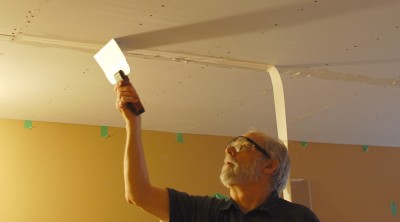
Step 1: preparing the drywall seam with mud.
Preparing the Seam
Using a 2” wide drywall knife, add the watered mud to the seam. My Dad uses perpendicular strokes, working the mud right into the seam, so that there’s full coverage.
Applying the Tape
Measure out a length of tape that you think that you’ll be able to work with. My Dad uses paper tape, because it does not leave gridlike ridges that the plastic tape does. Fit the tape into the groove of the drywall panel joint. Once you’ve placed a length of tape correctly, use your 2” drywall knife to press the tape into the seam. Mud will get pressed out to the sides, but don’t worry. Your next step is to work the excess over the top of the tape, so that it gets covered with mud. Add extra mud on top, and use perpendicular strokes to ensure full coverage.

Step 2: placing paper tape in the drywall seam.
This sounds easy, but this is the tricky part, I’ve found.
Finessing
Once your length of tape of fit into the seam and covered with mud, use several larger sizes in succession to go over the damp tape.
From your 2” knife, go to a 5”, then a 7”, then a 1’ wide knife. The exact widths don’t matter, but they should keep icreasing until you get to the widest you can find. This will ensure that any rough edges are smoothed away. From there, you just need to wait until the plaster dries. Instead of having a big sanding job before you can do your next coat, you should be ready to go if you’ve done it right.
Points to Remember
-

Step 3: pressing drywall tape into the drywall seam with a 2″ putty knife.
Your tape will naturally “bubble” along the centre of the seam when you’re working overhead. Don’t worry about this – once the plaster dries, it will get sucked back up into the seam.
- Don’t forget to clean up any drips right away with an old damp towel – mud is a lot harder to clean up once it has dried.
- If you’re going for a very satiny finish (which means one sanding pass at the end, even with this technique), you may want to use normal drywall compound, rather than the low-dust variety. The low-dust variety doesn’t end up as smooth.
-
Step 4: “feathering” the drywall seam with a series of plastering knives of increasing widths.
If you need to thicken your mud, add plaster of Paris.
- Screw holes don’t need to be taped, but they will need to be gone over several times as well. Don’t get distracted – do seams first or screw holes – don’t try to do both at the same time.
Experienced mudders will see that this technique won’t save you much time overall – with this technique, you’re putting in a lot of extra time working with the mud, instead of during the sanding phase. In fact, you might be taking more time overall – so this technique is probably not how the professionals with an empty house to work with will want to do it. But if you’re living in the same house as your work area, what you will get is a much cleaner house!
by Jennifer Priest
Follow me on Google +
The huge number of screws was me being overcautious. We didn't have small pieces of drywall (this time!) - I…