How to Garden Under a Norway Maple
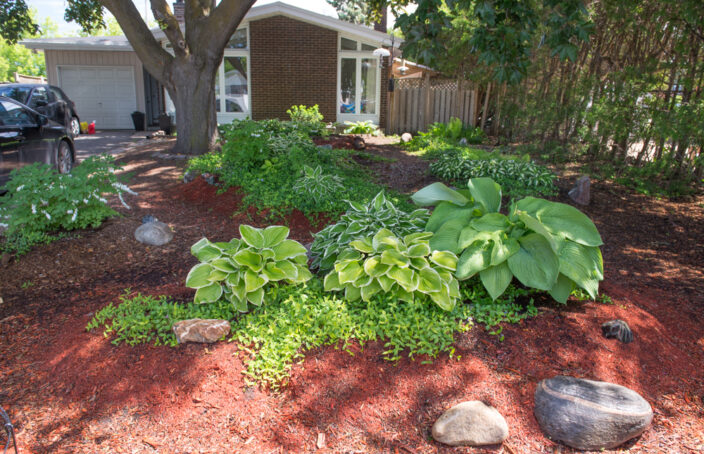
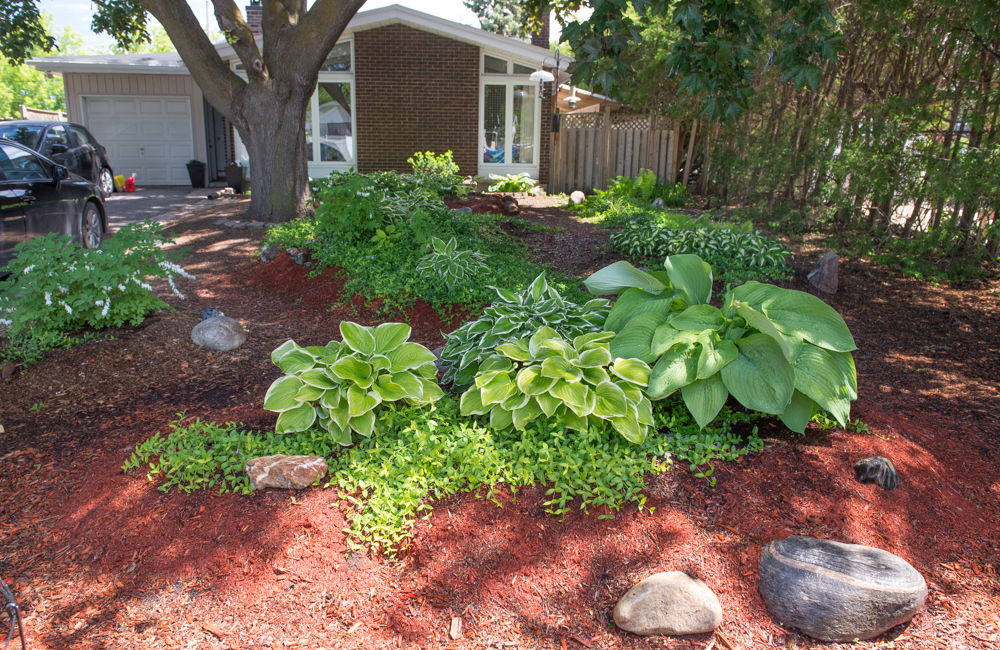
After four years of work, the garden is coming along, and the Norway maple is still healthy in spite of all the added soil.
Takeaways:
- Norway maples (Acer platanoides) are invasive in most areas and are an incredible pain to deal with. If you have the option, don’t plant them.
- Because of their surface root system and prolific seeding, gardening under a Norway Maple is very difficult.
- Raised beds can help new plants get started before their soil is invaded by the tree roots.
- You’ll need to do more feeding and watering and weeding to help understory plants thrive.

Before the raised beds: bare yard with lots of weeds.
In 2017 we bought a house with a big, beautiful old maple in the front yard. Little did we know that far from being a stately old gentleman with refined tastes, this tree was a vampire, sucking the moisture and nutrients from the soil.
When the snow melted and we saw the front yard for the first time, it was a bit disheartening. Under the unfurling burgundy leaves of our tree was the saddest, most patchy, weed-filled lawn I had ever seen.
After a bit of research, I decided to give up on the idea of a lawn entirely. Typical grasses just don’t thrive under Norways.
And so my gardening adventure began! Here’s what I’ve learned over the last four years of trying to garden under a Norway maple.
Pros and Cons of Norway Maples
Once we had identified our tree as a Norway maple (ours is a cultivar called Crimson King), we did a lot of thinking as to whether or not we should keep it.
The good news about Norway maples:
- They’re trees, and right now we need as many of them as we can get. In spite of all of humanity’s research and technical accomplishments, we have yet to design a more efficient and cost-effective carbon capture system than a tree. Additionally, any tree will provide a bit of refuge for wildlife.
- They provide shade from the hot summer sun, which reduces our air conditioning use.
- They are pollution-tolerant and will survive in city environments.
- Their roots are not known for aggressively attacking house foundations (more on root systems below).
- They aren’t overly susceptible to pests and diseases overall, although they are prone to getting tar spot (a fungal infection) and reportedly Asian long-harned beetles love them in Ontario.
- They’re fairly salt tolerant, which is important in a city like Ottawa that uses salt to keep roads safe in winter.
- They’re also tolerant of drought and soil compaction.
- They tolerate a reasonably wide range of soil pH levels, especially into the acidic end of the scale.
These factors are probably why Norway maples became the urban tree of choice in the 1950s and 1960s, after Dutch elm disease killed off most of the urban canopy.
There are, however, a lot of down sides to these trees. Here’s the bad news:
- They are unbelievably invasive in Canada and the USA for the reasons mentioned below (they feature prominently in Tree Canada’s “Tree Killer” list).
- Their root systems tend to be of the more fibrous, surface-feeding variety (as opposed to having more thick taproots, like oaks). This means they are great at competing with other plants for water and nutrients, which makes it difficult to grow other plants underneath them. To make matters worse, the roots extend well beyond the drip line of the tree.
- They are very prolific seeders, dropping two big crops of seeds in spring and fall (at least ours does—this may depend on the cultivar). Because most wildlife don’t particularly like to eat the seeds or foliage (including squirrels and chipmunks), these seedlings have to be ruthlessly weeded out by hand whenever they’re found.
- They create a very dense shade that tends to starve smaller plants of light.
- When their leaves drop in fall, they can create a thick layer that composts more slowly than other leaves if left in place.
- They co-exist with a wider variety of soil microbes and fungi than native maples, and some researchers think this may help them invade native forests.
- This point may seem insignificant to most people after everything else, but their fall colours are a bust compared to native maples, especially if you have a burgundy-leaved Crimson King cultivar like we do.
In the end, we decided to keep the tree, especially because there aren’t any forested areas within miles of our house that its seedlings could invade. We wouldn’t be inflicting a seedling army on neighbours either, as we’re surrounded by asphalt on three sides, and our neighbours have a Norway maple of their own. Also, we liked having a mature tree, and after living through the damage to Ottawa’s treescape from the emerald ash borer, our area needs as much tree cover as it can get.
That being said, if we ever had to take out the tree, we would definitely plant a different species.
How We Decided to Garden
1. Talk to an Arborist to Assess the Tree
Before we started any kind of gardening, we wanted to make sure our tree was in good shape. There are a few worrying things about our particular tree: it had a crack in one side, and some limbs that were growing over the roof of our house—we were concerned that one of them could come down in high winds. We asked an arborist for some advice on what the risks were and how to manage them.
There were also some worrying attempts at pruning that the previous owner had made, leaving in some cases almost a foot of branch and some odd sprouts. I already knew that when cutting a branch, cutting just above the collar (a slight bulge at the base of the branch) makes it easier for the wound to heal and prevents epicormic growth (the aforementioned weird sprouts).
Our arborist said the tree didn’t need to come down. He used a rod, driven through the trunk, to deal with the crack, as he felt that would work to support the main trunk. A set of pins and cables tied the big branches together for mutual support.
Then, his team donned harnesses and ropes and went into the canopy to give the tree the haircut of its life. Several medium and large branches came down, including the ones over the roof. Overall, many of the lower and mid-layer branches came out, in a process called “limbing up”, to let more light down to ground level.
2. Use Raised Beds to Give New Plants a Fighting Chance
A note of caution before you try raised beds: if you want to keep your Norway maple, don’t cover too much of the ground with thick soil/mulch at once. Trees use their roots to breathe as well as collect water and nutrients, and too much mulch or soil cover will suffocate the roots. This is even more important if you have heavy clay soil, which doesn’t have as many tiny air pockets between granules.
I added my beds and mulch over the course of several years because of budget limitations, and my tree is healthy and thriving today. I don’t know if other tree species could thrive with raised beds around them—they may not be as tough.
Design
Because most of my garden was shaded, I decided I wanted to do a woodland-style garden. It’s not a popular choice for front yards because it’s quite informal, but I felt that with the right touch it could work. I adapted a combination that my Mom used in her backyard: hostas, ferns and periwinkle.
Raised Beds Step By Step
On the advice of a post in a gardening forum, I decided to try raised beds. This would give the new plants a year or two to establish before having to compete with the Norway maple for water and nutrients. In keeping with my woodland theme (and also for budget reasons) I did informal raised beds, with no boxes around them, simply mounds of dirt with some mulch to protect from weeds.
Here’s how I created my raised beds:
- Lay out newsprint in the shape of your new bed. I covered the area of my bed with a layer of newsprint to kill the weeds below, and to buy some more time for my new plants before they’d have to compete with the Norway maple. Within a year or so, the paper decomposes and the bed becomes integrated with the garden. I should mention that I’m not a fan of landscaping fabric, as it eventually tears and lets weeds through, but doesn’t decompose. As I learned later, by not allowing the roots to get into the beds eventually, I could have killed the tree.
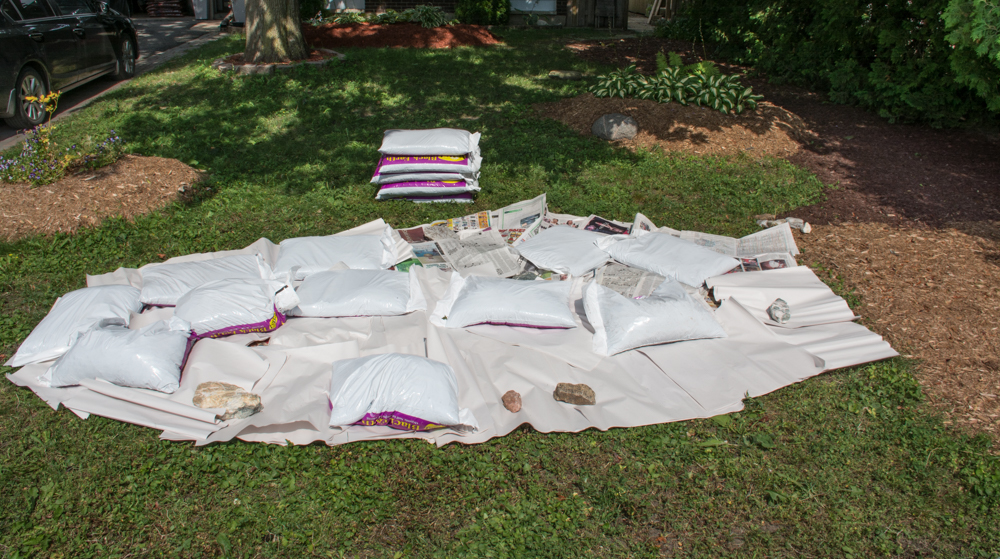
Step 1: lay out clean newsprint in the shape of your bed to provide a barrier to weeds. (It was a windy day when I did this, so I have bags of soil holding the paper down.)
- Add soil. I piled soil on top of the paper, a mixture of black earth with a little bit of peat moss thrown in to help with aeration and moisture retention. Trust me, the tree roots had no problem invading each bed over the course of a growing season.

Step 2 – adding soil to create a raised bed.
- Add plants. Each bed got a selection of hostas, periwinkle, and a few white bleeding hearts. Many of the hostas I planted were free; they were donated by my parents whose neighbour was getting rid of them.
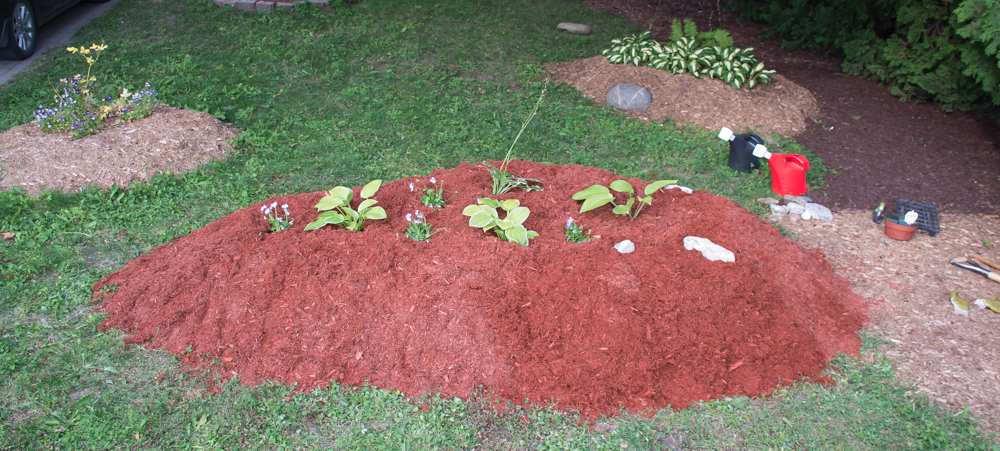
The finished raised bed, with mulch added around the sides.
- Mulch the edges to help the bed keep its shape. I soon learned that mulching the top prevented the periwinkle from spreading, so I removed the mulch and got much better results. The mulch around the edges helped prevent erosion (although it didn’t prevent squirrels and raccoons from digging the sides). Decorative rocks also helped hold the beds together.
Over time I expanded the beds, sometimes adding a new variety of hosta that caught my eye at the garden centre. Expanding the beds was easy: I would simply remove the mulch and add more soil.
I should also mention that the raised beds (at least the way I did them) is definitely a very informal look, and some people might not like the appearance. As my husband joked, “it looks like we hired a bunch of ants to do the landscaping”. Given my budget and my theme, and after several years have passed and it’s begun to fill in, I think it’s starting to come together.
3. Water the Whole Yard, Not Just the Beds
When I first planted each bed, I would water it to help the plants establish themselves. I didn’t water the entire yard, because I felt I’d be throwing money away, thinking that the tree could probably fend for itself.
What I was actually doing was training the tree roots to seek out the moisture, nutrients and air it needed from the beds.
Now I try to water the whole yard, to encourage the tree to seek water throughout the yard. Keeping the yard from drying out too much also makes it easier to weed.
You’ll definitely want to keep watering, because hostas need the moisture. If they don’t get enough water, they get smaller every year until one year, they just never come up. Don’t forget that they’re competing with monster tree roots for the necessities of life. They may not reach their maximum potential size, but they can reach a decent size for their particular cultivar.
4. Keep Weeding out Seedlings
If you hate weeding, don’t keep your Norway maple, because you’ll have a lot of work to do to keep up with the seedlings. I basically spend a few hours every weekend cruising the garden looking for sprouts, which crop up in the beds and even in the mulch. In the first few warm weeks of spring, when most of the seedlings get their first big growth spurt, I spend a full day each weekend dealing with the seedlings.
5. Mulch Those Leaves
I couldn’t believe how much of a game changer leaf mulch could be. Every fall, I’ve started mulching the leaves and covering the beds with them. In the spring (as early as possible) I remove the leaves, keeping them in the back yard and scattering some to improve the soil and using others in new plantings, mixed with soil.
While all the plants I’ve selected are reasonably hardy in my zone, the mulch has improved how lush they are. I’ve even experimented with having some parts of a bed mulched and others not, and the uncovered areas experienced more wind burn.
It’s important to remove the leaf mulch as soon as the snow melts in spring to allow perennials to grow properly, instead of having to push their way up under all that weight.
There is No Taming the Monster, But You Can Become Friends
Norway maples aren’t low-maintenance. It takes a lot of weeding, watering, and tidying to make a garden work under them. But after four years, I’ve learned to enjoy the tree and the amount of success I’ve had with the garden. I’ve even had a few compliments from my neighbours.
Note: I’m in Canadian Plant Hardiness Zone 5A / USDA Zone 3