Open Up: Creating Interior Windows in Load Bearing Walls
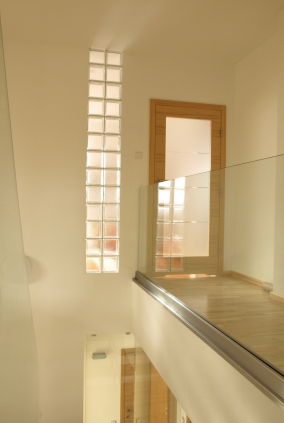
There are a lot of creative uses for interior windows, like the glass brick light window in this elegant example.
Our house is basically a glorified cave: it’s a townhouse with neighbours on three of four sides. Don’t get me wrong, there are advantages – but lots of natural light is definitely not one of them. Our renovation ideas have been united by a common theme: light – adding more of it and making the most of the daylight that does manage to come in. Since the International Style was born in the 1920s, architecture has become more and more about bringing daylight into home interiors, and in my own humble way I try to embrace this philosophy. Interior openings can also create a sense of connectedness and flow, uniting spaces within a house. This article will provide a general guide to major steps you’ll take if you want to create an interior window of your own.
At first I was really intimidated by the idea of cutting a hole in a wall that holds the rest of the house up, and I would definitely recommend you consult a building engineer if you are not 100% sure what to do or that it’s going to work. I was lucky – I have people with experience on my side: my Dad and my husband. As always, it’s better to be safe. You have been warned.
The basic principle when modifying a structural wall is to rebuild what remains so that it can still hold the same load, i.e. whatever is on top of it. If you think of a table, you can support it using four thin legs at the sides or one thick post in the middle – this is the same basic idea. The additional reinforcement will take the form of a horizontal support at the top of the opening called a header or lintel. The header takes the force coming from above, and transfers it laterally to the nearest vertical supports, and then down.
How Big Can Your Wall Opening Be?
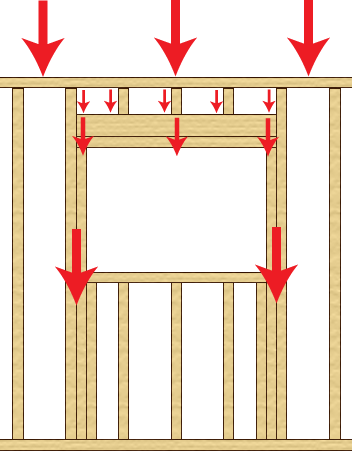
How framing works in a window to transfer the load.
You may be considering taking out an entire wall, creating a large pass through to a kitchen, or just a simple window that will let some light through. Your options will depend a lot on whether your wall is load bearing or not (read my post on how to tell structural from non-structural walls here). If your wall isn’t structural, you have a lot more options, but if it needs to hold up a bathtub full of water, a wall of bookcases, the rest of the second floor plus the roof, then your project is more complex. There are two reasons for this:
- You have to provide temporary support for the load while you are modifying the structural wall.
- You have to modify the wall so that it can support the same load once you’re done.
While it is possible to remove a load bearing wall entirely, the catch is it must be replaced with a big enough beam to support the load. The trick is figuring out how big the support needs to be for what you’re removing. This will depend on the bearing strength of the wall. There are a lot of factors that go in to bearing strength:
- How many stories the building is
- How wide the building is
- Potential snow load
- Building codes in your area
Needless to say, this is a complex set of calculations, and your will need to consult your local construction authorities to get this information.
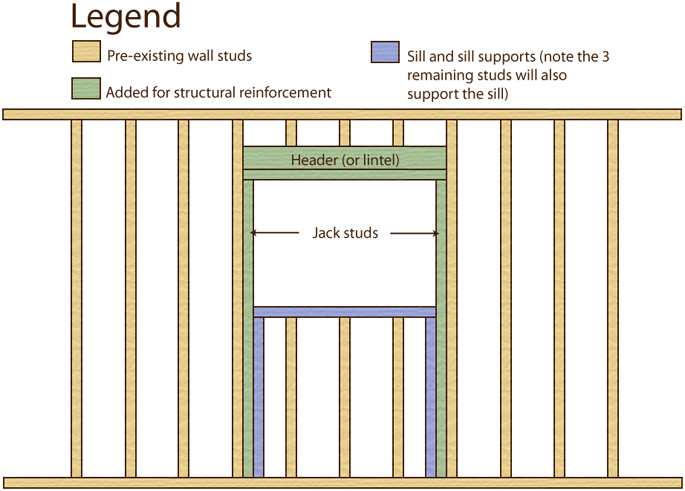
Anatomy of an opening in a load bearing wall: a header, sistered jack studs, and sill.
Creating Your Wall Opening
I let the locations of the studs determine the width of my wall openings. You could theoretically arbitrarily place your window anywhere you want, but that will mean extra framing work. Once I know where my studs are, I then figure out what my options are in terms of exact width, and plan to reinforce accordingly.
Before starting, determine the location of any wiring, plumbing, venting, or any other infrastructure that may be running through your wall. You have to have a plan for moving these if they are part of the area you’re working in, but that’s beyond the scope of this article.
- Build a temporary wall to support the load of the wall you are modifying. You may actually need to build two of temporary walls if the load bearing wall is supporting two sets of joists (a different set on either side of the wall). There are some great articles on how to do this, like this one on Ask the Builder. This video gives also a nice overview:
- Determine your starting point for your window. As most framing studs are 16” apart (in North America), you can determine your starting point from the edge of the wall, counting the 16” plus 1 ¾” for the width of each 2 x 4. Double check with a stud finder.
- Make a small starter hole in the drywall to confirm where the closest wall stud is. Poke the drywall saw through the drywall where you think you’ll be able to start your window and carefully make a small hole. Use a flashlight to peek in the hole and confirm where the stud is.
- Draw an outline of your window on the wall. Use a measuring tape to mark the dimensions, and a steel ruler or other straight edge to daw the lines. You will end opening more drywall than the size of your window, because you will need enough access to do all the framing work you need to do.
- Saw through the drywall along the lines to create your window and expose the wall studs. Carefully cut your opening in the drywall. If you see any studs that are thicker than a 2 x 4 (for example, a pair of 2 x 4s together, or more), these may be major structural members – absolutely do not cut through these until you know what they are, what they do, and how you plan to compensate for their removal.
- Cut through the studs you are removing. Make your line using measuring tape, steel ruler and level, and then make the cut with your saw.
- Sister the remaining studs. These are your jack studs indicated in the diagram.
-
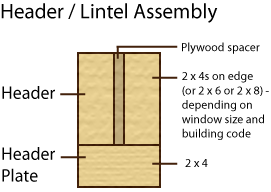
Side view of a typical header assembly used to reinforce a load bearing wall when making an opening.
Build the header or lintel. There are two parts to the header assembly, the header and the header plate. The header generally consists of beams lying on edge, and the header plate is a flat reinforcing beam below. The header plate will be the same width as the wall studs – the standard is of course the 2 x 4. For the header, depending on how many studs you are removing, you’ll have two 2 x 4s, 2 x 6s or larger. These will sit on edge because they will resist bending more this way – as they have a higher second moment of area in this orientation. The whole thing is assembled with screws and construction glue so that it functions as one beam.
- Add the bottom sill of the window. Add extra support each end, and use the remaining cut studs (or “cripple studs”) as additional support.
- Add surface finishing to your window. Add drywall corners to the top, right and left sides of your window, and from there it is a drywall mudding project. I like to add nice hardwood shelves on top of my sills.
Things to Consider Before You Create an Interior Window
- What will the view be like through the window? Is it something that won’t be worth seeing? If a bad view of a utility area is the only option, reconsider (or devote yourself to curating your storage room, which is also a valid lifestyle option). Another possibility would be a diffusing option like frosted glass or glass brick.
- Will the opening destroy the sense of privacy in a space that people use as an escape?
- Opening up a wall means everything can travel through, including cooking smells if the opening is near the kitchen. You may want to invest in a good range hood, or accept the fact that your bedroom pillows will smell of onions, whether you want them to or not.
- Will the window location be safe? Kids and cats love to climb on things, so make sure the base of the window will support their weight, and if needed add safety bars to prevent long falls if the window leads to a tall stairwell, for example.
- Consider that you may want to sell the house someday, and that potential buyers may want that barrier between the bathroom and the living room, even if you relish your new avant-garde space that challenges bourgeois privacy taboos, man.
Additional Resources
This video gives a great overview of how to build an entire wall from scratch, and can really help in understanding how window framing works in a load bearing wall.
by Jennifer Priest
Follow me on Google +
This isn't really true. Gypsum board does not have much value in shear resistance. Actual plywood sheathing will be on…